Updated 17 November 2026
What belongs in a bubble wrap brief for an item that sticks out on one side?
Include photos from several sides, the dimensions of the main body, and the length of the projection from base to tip. Mark where the item can be supported, the intended orientation, and the inside dimensions of the box. Build and check one trial pack for movement and for contact between the projection and the box wall. Send the findings and photos so your supplier and packing team can discuss the same setup.
Distinguish the body dimensions from the overall dimensions
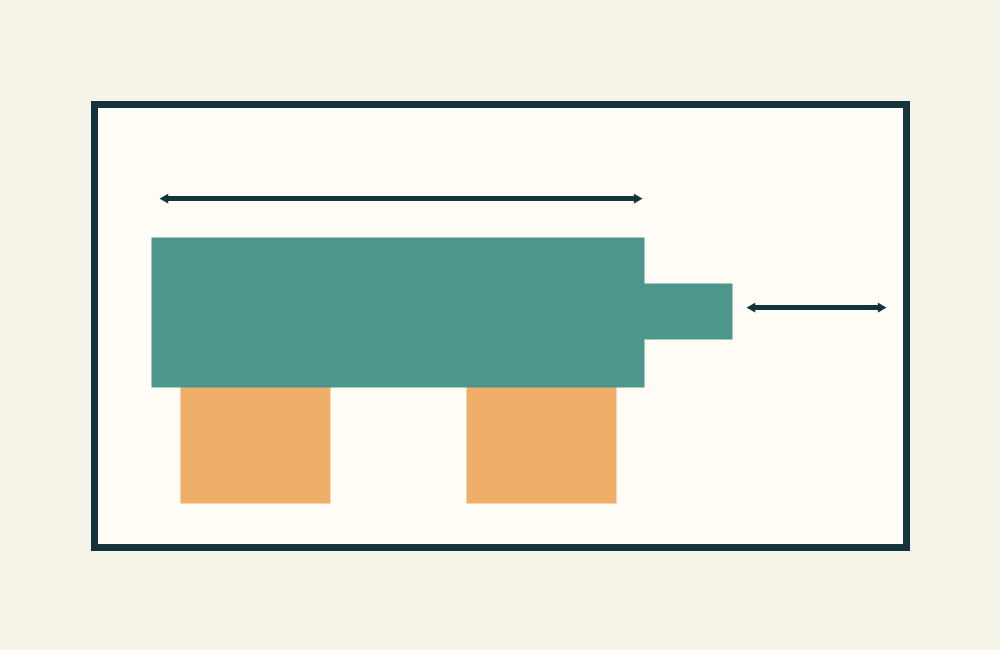
Think of an accessory with a rectangular housing and a connector extending from one end. The housing length helps identify support areas. The overall length to the end of the connector helps estimate the box space required. Record both in the same units. If the item is asymmetric, add the distance from the base of the projection to the nearest corner, then photograph the item from above and from the side. Mark orientation in the photos so the team can tell which side needs extra space.
Identify the parts that can take the load
Mark the photo to distinguish the body from components that need clearance. For the connector example, the team could try supporting the housing if the item design allows it, while reserving space around the connector. If the projection moves or can be removed, refer to the item manufacturer’s instructions before deciding how to pack it. Also mark surfaces that could scratch if they rub against a fastener or another component. These details affect where cushioning can sit and which parts may need separation.
Measure the available space after adding cushioning
Measure the inside of the box with the dividers installed. Compare those dimensions with the wrapped item in its intended orientation. Check the clearance between the projection and the nearest wall, including with the lid closed normally. A fold of bubble wrap at an end can take up more room than a single layer on a flat surface. If closing the lid presses on the projection, consider a different orientation or box size. Record the sample clearance you actually measured and how you measured it.
Build the pack around the main body
Wrap the item according to any surface care instructions, then place folds or cushioning against the support points you marked. Find a stable position without pushing filler against the tip of the projection. Use a restraint that keeps the body from sliding into the clearance reserved around the projecting part. If cables or heavy accessories are included, see whether they move when you slowly tilt the box. Separate an accessory that could press on the item. Photograph the position of each component before closing the box.
Check whether the projection reaches a wall
Draw an orientation mark or take a photo to record the starting position. After handling the trial parcel gently as it would normally be handled at the packing bench, open it and inspect the item, divider, and padding. Look for displaced folds, pressure marks on a wall, or signs that the tip moved into the clearance. If needed, move the support point or restrain the main body more effectively and repeat the check. This exercise checks the sample layout. Use testing suited to shipping risks and requirements to evaluate protection in transit.
Change one feature between trial packs
Number the two layouts you want to compare and use the same box and item where possible. For example, sample A supports the body from below with a fold at one side. For sample B, add a restraint near the base without changing the other layers. Open both samples the same way and document the results for that item size. If you change box size and cushioning together, record both as a new design. Code the photos to make it easier to discuss options suggested by the supplier.
Send a summary the supplier can quote against
Combine the photos with dimensions before and after wrapping, box type, items per box, expected usage, and destination city. If the tip is fragile, mark exactly where and include the item maker’s handling instructions. Add your observations, for example that sample B stayed in position after being moved between benches and left no visible wall marks when opened. Say whether you want a material sample or want to discuss roll width for a cutting pattern you already tried. Purchasing can then reference that layout code in the quotation record.
Keep a reference after selecting a layout
Keep a reference photo showing the projection, support points, and order of assembly. Add a simple orientation mark if the item could be placed the wrong way round. Record a pack size you actually tried in the work instructions and note who approved it. Repeat the checks if the shape, accessory weight, or box changes. A small difference at a projecting point can change the available clearance even when the body width stays the same. Keep the new check record beside the previous one so the team can trace what changed.
An example for thinking through remaining space
Suppose the main body is 18 centimetres long and the projection adds 3 centimetres along that axis. The resulting 21 centimetres describe the item before wrapping. If folds take up extra room at both ends, measure the wrapped sample before selecting a box. Also note whether the diameter or width of the projection stops a divider from reaching the base. Place a ruler parallel to the long axis in a photo to show where you measured. If the support rotates the body slightly, measure the distance to the wall again. Keep the measurements as a record for that sample. If you need to use an existing box, send its actual inside dimensions and photos of orientations that still fit.
Plan the cutting pattern from the sample
Once the item sits securely, measure the pieces of wrap used in the trial. Record the cutting direction and the location of joins or folds. If the projection produces a lot of offcuts, compare a main piece for the body and a separate piece for a part that can safely be covered. Keep the clearance around the tip even if leaving it complicates the cutting pattern. Show the supplier a sketch or photo so the conversation about roll width starts from your actual layout. Record usable pieces separately from offcuts so you can refine the estimate after another trial.
Mark the checks the team should make during packing
If the chosen wrap obscures the item, show a photo of the item before wrapping and add an orientation mark to the outside of the wrap. Specify when to check the projection clearance, for instance before installing the last divider. If the mark disappears during packing, add a check as the item goes into the box. Make sure someone following the instructions can distinguish the correct position from the reverse without remembering the trial photo. Keep separate references for near-identical products whose projections point in different directions.
See the Cave Mekar Group bubble wrap product page and use its quote form link to discuss the dimensions and results of your packing trial.
Frequently asked questions
Should the projection touch the cushioning?
Identify the support points allowed by the item design. If the projection needs clearance, restrain the body and check the distance after closing the box.
Which dimensions should I use to choose the box?
Use the overall dimensions after wrapping, then compare them with the space inside the box once the divider is installed.
Is one photo enough for a quote?
Take photos from several angles so the projection, support points, and orientation in the box are clear.
What shows that the support layout needs changing?
Look for pressure marks, item movement, or padding that has shifted into the clearance. Try another sample after changing the support.
When should I retest the layout?
Repeat the check when the item shape or weight, accessory layout, or box dimensions change.